#16- Import or Export Setting status

1. Export setting status
You can save GangBook setting as SD file format.

Go to Menu > Setting


Click ‘Save setting’ menu.


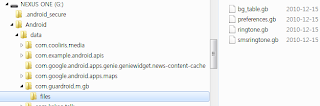
Setting information is stored at SD(/Android/data/com.guardroid.m.gb/file/).
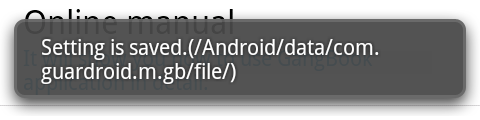


If you delete GangBook application, ‘com.guardroid.m.gb’ folder and subordinate directory are also deleted. You can save at ‘com.guardroid.m.gb’folder.


2. Import Setting Status

You can apply saved setting file at GangBook application.
Copy ‘com.guardroid.m.gb’ folder and paste it at ‘/ Android/data/’ directory.

Go to Menu > Setting

Click ‘Saving restoration’


It is processing to bring information.


It is finalized to apply set up to GangBook application.


#15 - Initialization of Ringtone

All contact’s ringtone will not be automatically defaulted even though you delete GangBook application. You need to reset up the ringtone.

You can initialized ringtone of all group and contact information.

Go to Menu > Setting


Click ‘initialization of group ringtone’.


Final check to be initialized all contact’s ringtone.


Initialized all contact’s ringtone.

#14 – Appear Only Contact Information that Include Phone Number

You can set up appearing only contact information which has phone number at GangBook application.

Move Menu > Setting


Check/uncheck ‘Only Contact with Phone’ menu.


Influence of this set up option:
Information which do not have phone number will not be deleted and would go to ‘No registered’ group when the group is deleted.

#13 – Change Lists of Group Lists

Groups are normally ordered by alphabet.
But, it can be changed or edit depending on user’s favors.

Move Menu > Setting.


Click ‘Edit(Change) group order’ menu.
Edit screen of group lists would be shown up.
It will show all group lists belonged to all accounts.


Select and long click specific groups.


If you drag at the long click condition, the group order would be changed or edited.

#12 – Appear/Disappear (Show/hide) Google system group

You can choose whether appear or disappear Google system group.
Move Menu > Setting


Check or uncheck ‘Include Google System Group’ Menu


Influence of this setting:
I recommend adding new contact information, using GangBook itself information.
If you make Google system disappeared, new contact which you added from system phonebook application would not be shown up.
Because new added contact is normally belonged to ‘Contacts’ group.
You can also find new added contacts at ‘Contact’ group if you check ‘Include Google System Group’ menu.

#11 – Delete Contact Information

There are three ways to delete contact information.

1.Delete individual contact Information
Long click the contact information and click ‘Delete’.


Check whether you will delete selected one.


Deletes contact information.


2. Delete Group Contact Information
Long click the group and click ‘Delete’.
Decide whether you delete both group and contact information or only contact information.


Selected information would be deleted.


3. Delete Specific Contact Information
Check group and contact information which you would like to delete.
Click ‘Delete’ button on the bottom of Tab bar.
Check whether you will delete selected contact information.


Selected contact information will be deleted.

#10 – Copy contact information to other group

Now preparing...

#9 – Move contact information to other group

There are three ways to move contact information other groups

1. Move to individual contact Information to other group
Long click contact information and click 'Move'.


Select designated group.


It is completed group moving.


2. Move to group contact Information to other group

Long click the designated group, click 'Move', select designated group.

It is completed group moving.


3. Move to particular contact Information to other group

When GangBook application shows all account in the system, only four options ‘SMS,’ ‘e-Mail,’ ‘Share,’ and ‘Delete’. But, you cannot use ‘Move’ and ‘Copy’ menu.

Check group(s) and contact(s) information which you would like to move.


Click ‘Move’ button at the bottom of Tabbar.
Select the group which you want to move to other.
It is completed group moving.

#8 – Send SMS/MMS to many other people

In order to send SMS/MMS to many other people, there are two ways.

1. Send SMS/MMS to group members as a whole
Long click group items.

Select 'Send SMS to Group'.


2. Send SMS/MMS to specific(any) members
Select the check box left side of contact name. 


Click SMS button below side of Tab bar.

If more than one SMS program are setting up and processing, program selecting screen will be appeared.


Depending on the system, you can be limited to send SMS to others once.
In this case, I recommend using other third party applications like 'Handcent SMS'.

#7 – Set up SMS Notification Sound to group

After long click certain group, click 'Set Group SMStone'.


Then, ringtone lists will be shown up.


Select ringtone and click 'Ok' button.


Menu > Setting


Check 'Enable group SMStone'.


You need to check ‘Default SMS notification sound’ and select specific ringtone for receive SMS/MMS from contacts which do not have any information or register to any group.


You need to make clear other SMS alarming system. Otherwise, it can be duplicated when receive SMS.

For Nexus One smart phone, here are steps to clear basick SMS alarming sound.
1. Operate SMS applications
2. Go to Menu > Settings > Select Ringtone
3. Check 'Silent'


#6- Set up Ringtone to group

Click group for a long time and 'Set Group Ringtone' menu.


Lists of ringtone will be appeard.


If you touch specific ringtone and click 'OK' button, it will be set up as your wish.

#5 - Add Contact Information

If you want to add contact information, long press the group which you want to add and click “Add Contact”.


There are two ways to add contact information.


1.    Add new
You can put all information as one by one.
2.    Add from call log
You can add contact number from call record.

If you select group ringtone or SMStone, new added contact information is automatically followed by the group setting.

If you add new contact information from other program, ringtone or SMS tone does not applied automatically. You need to set up additionally.